Posted in Uncategorized

How To Create A Shimmery Winter Background


Imagine's avatarImagine Blog

by Nadine Carlier

Winter Wishes Card by Nadine Carlier IC

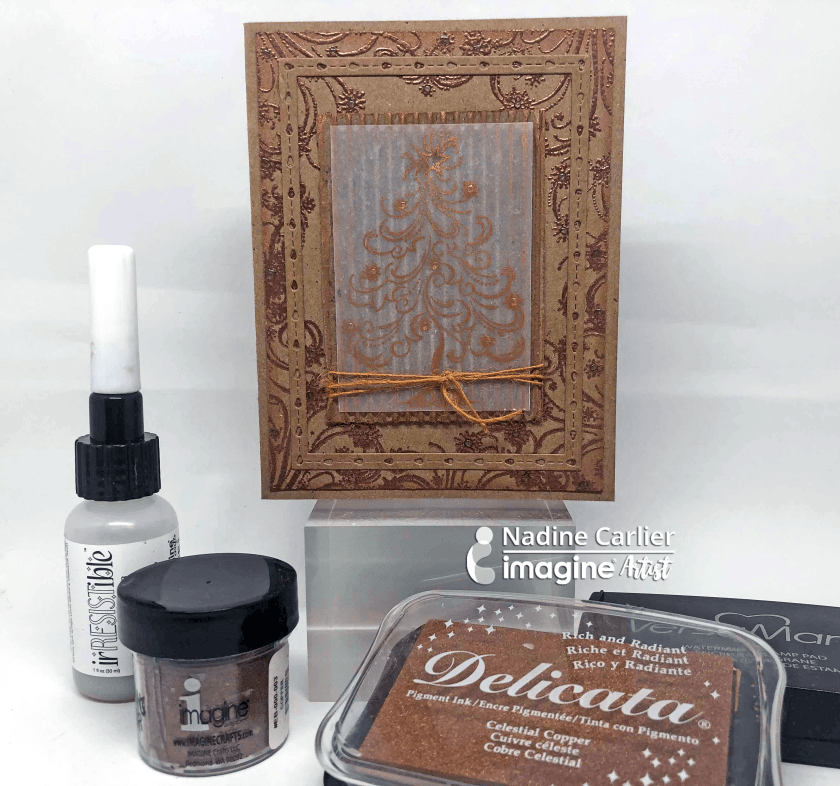
The metallic shimmer in Delicata inks is perfect to create a shimmery winter background. Watch my video below to see exactly how I did it.  Enjoy!

Skill: Intermediate
Time: 30 minutes

Supplies

Imagine
Other

Visit our YouTube Channel for more inspirational videos and subscribe to get updates when we post new videos.

View original post

Posted in Uncategorized

Monochromatic Christmas Card


Imagine's avatarImagine Blog

by Nadine Carlier

Monochromatic Christmas Card by Nadine Carlier IC

Creating a monochromatic card was easy when using some Delicata Celestial Copper and Copper Embossing powder. Watch my video below to see exactly how I did it.  Enjoy!

Skill: Intermediate
Time: 15 minutes

Supplies

Imagine
Other

Visit our YouTube Channel for more inspirational videos and subscribe to get updates when we post new videos.

View original post

Posted in Uncategorized

Learn How to Create a Christmas Card with Rinea Foil Paper!


Imagine's avatarImagine Blog

by Melissa Andrew

Learn How to Create a Christmas Card with Rinea Foil Paper!

Today, I show you how to create a simple overlay background with Rinea foil paper over a Fireworks Shimmer Spray background for a Christmas card. In addition, I teach you how to use a simple masking technique to double your stamping effect as well as Memento markers to create dimension. Enjoy!

Skill: Advanced
Time: 1 hour +

Directions

Supplies

Imagine

• Fireworks Shimmery Craft Spray – Tangelo, Dandelion
• VersaFine Clair – Nocturne
• Memento Markers – Cottage Ivy, New Sprout, London Fog, Tuxedo Black
Irresistible Pico Embellisher – Gold Shimmer, Wedding Dress White
• On Point Glue
• Tear It! Tape

Other

• Rinea Ebony Foil Paper – http://bit.ly/2zZa308
• Little Darlings Rubber Stamps – Tree line http://bit.ly/2PyzMHs and Mountains http://bit.ly/2ORquRI
• Whimsy Stamps – Everyday Scripted Sentiments http://bit.ly/2Ke3Sub
• Whimsy Stamps – Penguins Winter Adventure http://bit.ly/2A2uEku
• Paper Trimmer
• Scissors
• Masking Paper
• Watercolor Paper
• White Card Stock

View original post 2 more words

Posted in Uncategorized

Create an Inspiring Card with Rinea Foil


Imagine's avatarImagine Blog

by Jowilna Nolte

Create an Inspiring Card with Rinea Foil

What perfect way to create an Autumn inspired card than using the wonderful range of StazOn inks from Imagine and Rinea Foils. These foils are great for coloring and die-cutting and together make for a stunning effect. Take a look at how I achieved this stunning end result using these amazing products.

Skill: Advanced
Time: 1 hour

Directions


Step 1

Add a layer of wide double sided tape to the back of a sheet of Rinea Foil and adhere it to a piece of plain cardstock to make it nice and firm for die-cutting.


Step 2

Use a frame die to cut the foil. Because of the added cardstock, the die did not cut through but rather created an embossed look. The double-sided tape also helps to keep all those little pieces intact adding to the overall look.


Step 3

Use your StazOn inks with…

View original post 246 more words

Posted in Uncategorized

Create a Frosted Blue Season’s Greetings Card


Imagine's avatarImagine Blog

by Martha Lucia Gomez

Create a Frosted Blue Season's Greetings Card

Today I have something “cool” to make! I use an ice technique and “frosted blue” color challenge to create a Season’s Greetings holiday card. To make this technique you only need StazOn Ink, metallic paper, VersaMark and embossing powder to obtain a good shine in your project.

Skill: Intermediate
Time: 30 minutes

Directions


Step 1

I started with a piece of Silver Foil Sheet from Stamping Up. I decided in advance which stamps I wanted to use and I cut the paper a little bigger of the stamps to create the ice look. Then I applied the ink directly with the StazOn Inkpad Blue Hawaii from left to right and then repeated the process but from right to left.


Step 2

The idea is to create intermittent horizontal lines and have the borders a little darker. Depending on the brand of the foil paper that…

View original post 291 more words

Posted in Uncategorized

Learn How to Build a Papercrafted Wreath with Dewlets


Imagine's avatarImagine Blog

by Roni Johnson

Learn How to Build a Papercrafted Wreath with Dewlets

I love my Dew Drop ink pads…they are just the right size. They are small enough that they take up less space yet big enough to hold lots of ink for all of my projects. Imagine has come up with an ingenious idea of using these Dew Drops not only as ink but as the main component of a project using the brand new Dewlets dies! These little dew drop shaped cutting dies are perfect for all sorts of projects including the Laurel wreath I made for you today.

Skill: Advanced
Time: 4 hours

Directions


Step 1

Stamp out dozens of dew drops using several colors of Memento and VersaMagic inks. In addition to these Dew Drop shapes, I also rubbed Delicata Golden Glitz and Emerald Green inks onto white cardstock.


Step 2

Die-cut all of the dew drops using the Dewlets dies. Cut out…

View original post 148 more words

Posted in Uncategorized

Learn How to Make a Card with Dewlets and Vellum


Imagine's avatarImagine Blog

by Martha Lucia Gomez

Learn How to Make a Card with Dewlets and Vellum

Hello everyone! Today I am going to show you how to turn the Dewlet shape into a flower using vellum. Vellum is one of the most delicate and versatile papers. Not all inks work well on vellum and today I will share with you a complete card that I made using it with Memento Luxe ink.

Skill: Intermediate
Time: 1 hour

Directions


Step 1

Ink the vellum using two different colors of Memento Luxe ink in Danube Blue and Teal Zeal to create the background. Take a piece of vellum cardstock and apply the Memento Luxe ink directly with the ink pad. Do not mix the colors of the ink to avoid contaminating it with a mixture of colors. With an ink blusher distribute the ink over the vellum surface and fix the color with the heat tool or leave dry the piece very…

View original post 308 more words

Posted in Uncategorized

Create Paper Poinsettias with Memento Ink and Dewlets


Imagine's avatarImagine Blog

by Steph Ackerman

Create Paper Poinsettias with Memento Ink and Dewlets

Dewlet Etched Metal Dies are perfect to use with Dew Drop Inkpads. Simply stamp the droplet shapes then align and cut the dies using any die cut machine. There are many options with the shape to play and experiment. Once I started playing with the dies, I found myself creating two very different cards. Simply by flipping the droplet shapes allows you to create poinsettias, leaves, and even dragonflies.

Skill: Intermediate
Time: 1 hour

Directions


Step 1

Stamp each stamp pad onto white cardstock. Punch out the petals by using the Dewlet dies and a die cut machine.


Step 2

Ink around each petal for dimension, then use a stylus to give the petals dimension.


Step 3

Create the background by inking a large background stamp with white ink then emboss with clear embossing powder to create a tone-on-tone effect. Using a jumbo dauber, ink…

View original post 279 more words

Posted in Uncategorized

How to Make a Realistic Snowy Background on a Holiday Card


Imagine's avatarImagine Blog

by Kassy Tousignant 

How to Make a Realistic Snowy Background on a Holiday Card

Doodlestix, embossing powder, and Fireworks spray team up to make the most wonderful wintery background for the cute snowman!  I really love making impressions with stamps in embossing powder. You can get some very exciting and sometimes unexpected results.  The Doodlestix worked perfectly to help create a swirling winter snow scene for this mixed media card.

Skill: Advanced
Time: 45 minutes

Directions

Supplies

Imagine
Other
  • Simon Says Stamp – stencil
  • Unity Stamp Co – Snowman stamp set
  • Elizabeth Craft Designs – crystal clear glitter
  • Cardstock – white, black, silver glitter
  • Vellum

View original post 9 more words

Posted in Uncategorized

Learn How to Make Wood Slice Holiday Ornaments


Imagine's avatarImagine Blog

by Kyriakos Pachadiroglou

Learn How to Make Wood Slice Holiday Ornaments

Make Christmas tree ornaments using bark slices painted with All-Purpose Ink in White and stamped with Christmas theme stamps. The surface of the wood slices are covered with Creative Medium for an iridescent result and then stamped with Memento Luxe Bahama Blue ink and sealed with clear embossing powder from Imagine. For once more the Radiant Neon Amplify in White makes the perfect snow result and works as a glue medium to add the ice crystals.

Skill: Beginner
Time: 45 minutes

Directions


Step 1

Dilute some All-Purpose Ink with water and paint the wooden slices.


Step 2

When the paint dries use a palette knife to cover with Creative Medium Iridescent Blue.


Step 3

Stamp with Memento Luxe Bahama Blue ink pad.


Step 4

Cover with Imagine’s clear embossing powder and heat set.


Step 5

Add Radiant Neon Amplify! White paint on the top side of…

View original post 101 more words

Posted in Uncategorized

See How to Create a Snowflake Spinner Card


Imagine's avatarImagine Blog

by Jennifer Vanderbeek

See How to Create a Snowflake Spinner Card

I adore blue and silver as a holiday color scheme (or any time of year, for that matter), so for the Frosted Blue color challenge, I created this card with a frosted-looking inside scene (courtesy of Creative Medium mixed with VersaColor) and a fun spinner element in the front-panel frame. The Rinea foiled paper is sturdy enough to hold its shape, even when cut so delicately, making this card a real display piece for the holidays.

Skill: Advanced
Time: 1 hour

Directions

Supplies

Imagine
Other
  • Navy Linen Cardstock
  • Rinea Foil Paper – Silver Starstruck
  • Stampers Anonymous – Tree stencil
  • Paint Brush
  • Electronic Die Cut Machine
  • Craftables – Snowflake SVG Cut File
  • Bo Bunny – Sentiments Stamps
  • Darice – Heat Tool

View original post 14 more words

Posted in Uncategorized

See How To Make A Snowman Card


Imagine's avatarImagine Blog

by Elina Stromberg

See How To Make A Snowman Card

Our color of the month is ‘Frosted Blue’. Imagine provides several product options for playing with this cool color. I decided to use ‘Summer Sky’ Fireworks Spray for creating a light blue background for my winter-themed card. In addition to the beautiful soft blue color, Fireworks adds a lovely shimmer to your project that is just perfect for a frosty, icy blue winter themed card!

Skill: Intermediate
Time: 1 hour

Directions


Step 1

Stamp and color the snowman image on white paper. When coloring with alcohol markers (like Promarkers, Copics), use water-based ink for stamping. Memento Tuxedo Black is my No. #1 choice for the task!


Step 2

Pour a small drop of Fireworks Shimmery Craft Spray on the Craft Mat. Dab the color on the card front panel with a Jumbo Dauber. Don’t cover the entire card front with the color but leave some…

View original post 98 more words

Posted in Uncategorized

Learn How to Make a Silver Tree Christmas Card


Imagine's avatarImagine Blog

by Iris Rodriguez

Learn How to Make a Silver Tree Christmas Card

Make minimalist, truly handmade Christmas card with IrRESISTibles Pico Embellishers. This texture medium fitted with a fine-tipped applicator makes it easy to draw a Christmas tree or any other Christmas/Holiday doodles. Simply add embellishments and stamp a sentiment to arrange a unique design.

Skill: Beginner
Time30 minutes

Directions


Step 1

Spray water on the watercolor paper. Spray Fireworks Craft Shimmery Sprays in Summer Sky then spray Danube Blue.


Step 2

Using VersaFine Clair in Blue Belle with the Jumbo Dauber ink the paper in random sections, and along the edges. Then ink with VersaMagic Cloud White.


Step 3

Draw the Christmas tree with the irRESISTible Pico Embellisher in Silver by drawing a series of connected swirls.

I decided to paint some of the rhinestones with the StazOn ink in Blue Hawaii
Step 4

I have to admit I wanted to add blue and clear rhinestones to the tree to make it look like ornaments. However, I did not have blue rhinestones…

View original post 85 more words