eclipsedwords.com/2018/11/10/intuition-can-help-you-overcome-self-doubt/
The struggle
ACV

Learn How To Make A Gingerbread Theme Gift Tag
by Jowilna Nolte

Make some cute gingerbread theme tags for your gift giving this holiday season. Inspired by the numerous light brown inks and products that fall into this color scheme, I created these holiday tags to inspire you. Enjoy!
Skill: Advanced
Time: 30 minutes per tag
Directions

Step 1
On your Craft Mat mix a small amount of glossy texture paste and Delicata Golden Glitz inker.

Step 2
With a palette knife, apply the colored paste to some white cardstock and leave to dry. A nice thin layer is all you need – add as much texture and dimension as you want.

Step 3
Once the texture paste is dry, use VersaMagic Gingerbread and color the entire piece of cardstock. Blend the ink over the texture paste, then cut a strip about 3cm wide and the length of you tag.

Step 4
Stamps some Christmas baubles (or…
View original post 190 more words
Cute thanksgiving desserts!

Use Simple Shapes to Make Holiday Cards
by Jennifer Vanderbeek

There are so many cute and fun stamps and dies on the market these days for the holidays that it’s truly tough to resist them. I don’t know about you but there’s only so much room in the budget and the stamp storage to go around, so I’m always happy to come up with ways to use the things I already have and getting more mileage out of my tools and supplies. To that end, these cards use patterned stamps that are not holiday-specific and simple shapes you can cut with basic dies, punches, or even just scissors. These simple shape cards are also perfect for crafting with kids in preparation for the holidays!
Skill: Intermediate
Time: 1 hour depending on the number of cards
Directions
Supplies
Imagine
• Delicata – White Shimmer, Pink Shimmer, Ruby Red
• VersaFine – Olympia Green
• VersaMark –…
View original post 146 more words
Create a Grey Plaid Poinsettia Handmade Christmas Card
by Martha Lucia Gomez
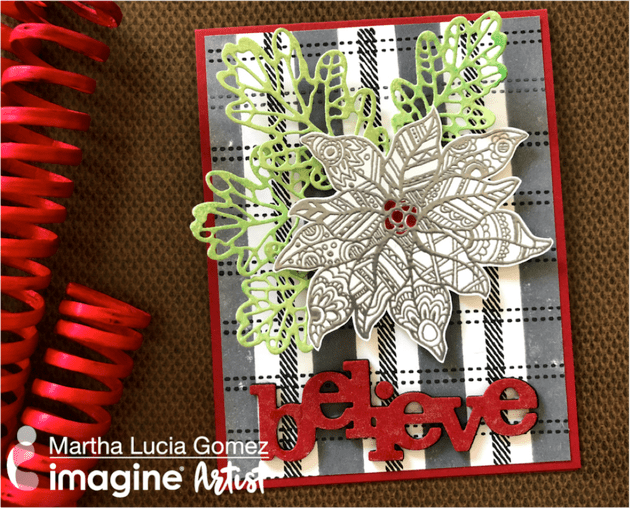
In this world, we want to buy everything we like and see, but sometimes experimenting and recreating is part of the fun. Today, I am sharing with you a card that I made using beautiful single pieces that I combined with “necessity” because I don’t have a plaid stamp! I am crazy with the fabulous plaid designer papers that I saw during this season but I decided to create my own pattern just using two colors of VersaFine Clair Ink and without embossing to make it more rustic.
Skill: Advanced
Time: 1 hour
Directions
Step 1
I took a stamp set from Peek-a-Boo Designs that includes a lot of different stripes and selected just two or three to be used on my card. I positioned the stripes in my Stamparatus and stamped stripe by stripe using for the wide strip VersaFine Clair Morning Mist…
View original post 335 more words
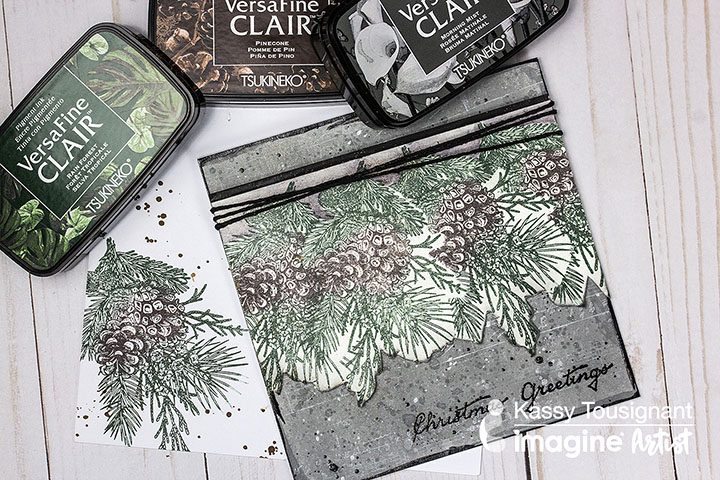
Create a Matching Envelope and Christmas Card
by Kassy Tousignant

VersaFine Clair Ink and large sponge daubers make great patterned background papers for all of your projects! Check out this video to see how I used them to make a beautiful, distressed background for my Christmas card and matching envelope. The colors are so rich and vibrant and create the perfect matching set.
Skill: Advanced
Time: 1 hour
Supplies
Imagine
• VersaFine Clair – Nocturne, Pinecone, Rain Forest, Morning Mist
• VersaMagic – Cloud White
• All-Purpose Ink – Cool Grey
• Embossing powder – Black
• Memento Markers – Tuxedo Black, London Fog
• Ink Potion No 9
• Sponge daubers
• Fireworks Shimmery Craft Spray – London Fog
• Walnut Ink – Walnut
• IrRESISTibles Pico Embellisher – Black
• GooseBumps – shimmer
• Tear It! Tape
Other
• Prima – Clear gesso
• Black twine
• Cardstock – white
• Envelope
• Stampers Anonymous – Tim…
View original post 4 more words
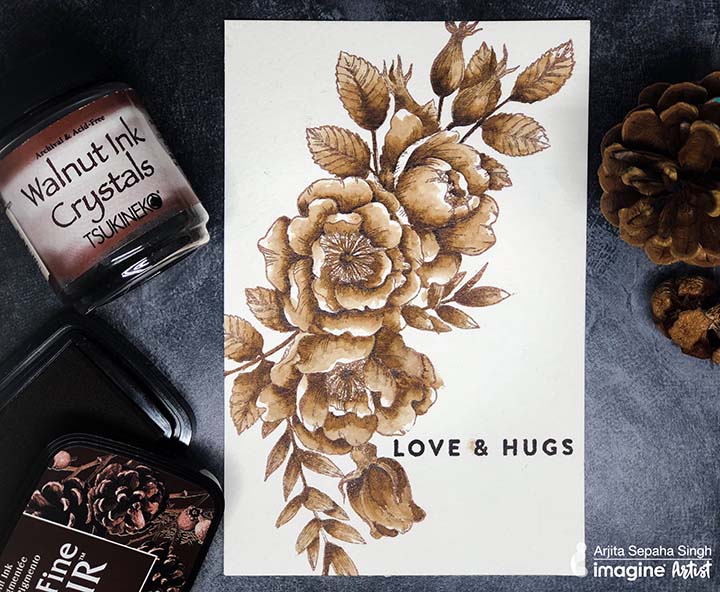
Learn Vintage Monotone Watercoloring with Walnut Ink
by Arjita Sepaha Singh

I stamped a beautiful flower bunch from Simon Says Stamp with Brilliance Ink on a watercolor paper. I added some water on a small scoop of Walnut Crystals and painted the entire bunch with it. This is a monotonic theme card and I have used only one pigment to create all the highlights and shadows. I stamped a simple sentiment with Pinecone Versafine Clair ink and the painted panel is ready.
Skill: Advanced
Time: 1 hour + dry time
Directions
Supplies
Imagine
- Walnut Crystals
- VersaFine Clair – Pinecone
- Brilliance Ink – Cosmic Shimmer
Other
- Watercolor paper
- Misti Stamping Tool
- Simon Says Stamp – Beautiful Flowers sss101826 Stamp

Learn How to Make Shiny 3D flowers using Rinea Foils
by Arjita Sepaha Singh

For today’s Wedding Day card, I used the Rinea Foil Papers which can be embossed, die cut and shaped. I used a floral die set to cut the flower petals and with the help of a metal brad fixed them together. Once the flowers were punched, I shaped the flowers and leaves with my hands which was so much fun. I added the 3D elements on a silver Foil paper and finished the card with a sentiment in black. I love the way these gorgeous flowers pop forward and create this beautiful effect.
Skill: Advanced
Time: 30 minutes
Directions
Supplies
Imagine
• StazOn – Jet Black
• Tear It! Tape
Other
• Rinea Foil – Mocha, Blue
• Metal brad
• Flower Die
• Glue Dots
• Acrylic Blocks
• Scoring tool
DIY!
A Train at Sunset
An approaching train on a railroad bridge at sunset
 A Train at Sunset
DIY – How to make a Customised Dream-Catcher 💕🌸🌈 — sheemazaman
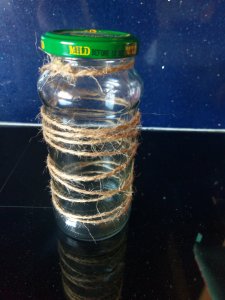
DIY twine wrapped jar lights
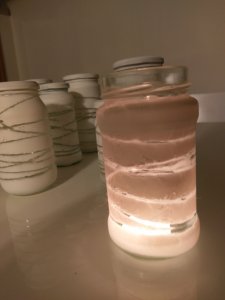
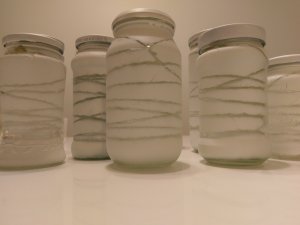
I read a few different tutorials.
It’s very very easy.
You need
Empty jars no sicker (soak in water to peel off)
Twine (garden style)
Hot glue gun
Spray paint off choice (mine is matt white)
How
Dab a tiny bit of hot glue on base of jar rim attaching the end of the twine on the roll
Wrap randomly down then back up fairly snuggly
If any bit are moving glue with a tiny dab of hot glue
Wind back to start, glue again and snip off
Outside follow paint can instructions and spray from all directions
You want to be smooth and fine in your layer not thick and dripping (you can always do another layer).
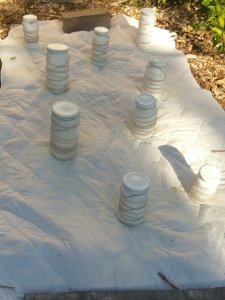
Wait until it’s dry
Peel off twine. I started at the glue join. This removed the glue nearly perfectly. You could pick of any remaining glue but it’s clear anyway.
I’m planning…
View original post 45 more words
Stress, cortisol and weight gain
If you’ve got your finger on the pulse of health trends, it’s likely you’ve been hearing the current buzzwords “cortisol creates belly fat” and “cortisol causes muscle wasting and fat storage.” These are the type of catch phrases that gain momentum every few years. And although some of the fads and trends showing up seasonally in fitness are myths, this caution about chronically elevated cortisol is true. Cortisol is also deeply connected with the dangers of chronic inflammation, which I described in another article, “Inflammation Creates Diseases.”
Like many hormones, cortisol has an effect on a wide variety of functions in the body. Although it’s getting particularly demonized lately, cortisol serves some very important and positive functions in the body. It’s an essential component of the flight or flight response, so it gives us energy, focus, strength, motivation and courage. But, like with sugar or caffeine, it comes with a…
View original post 786 more words
